
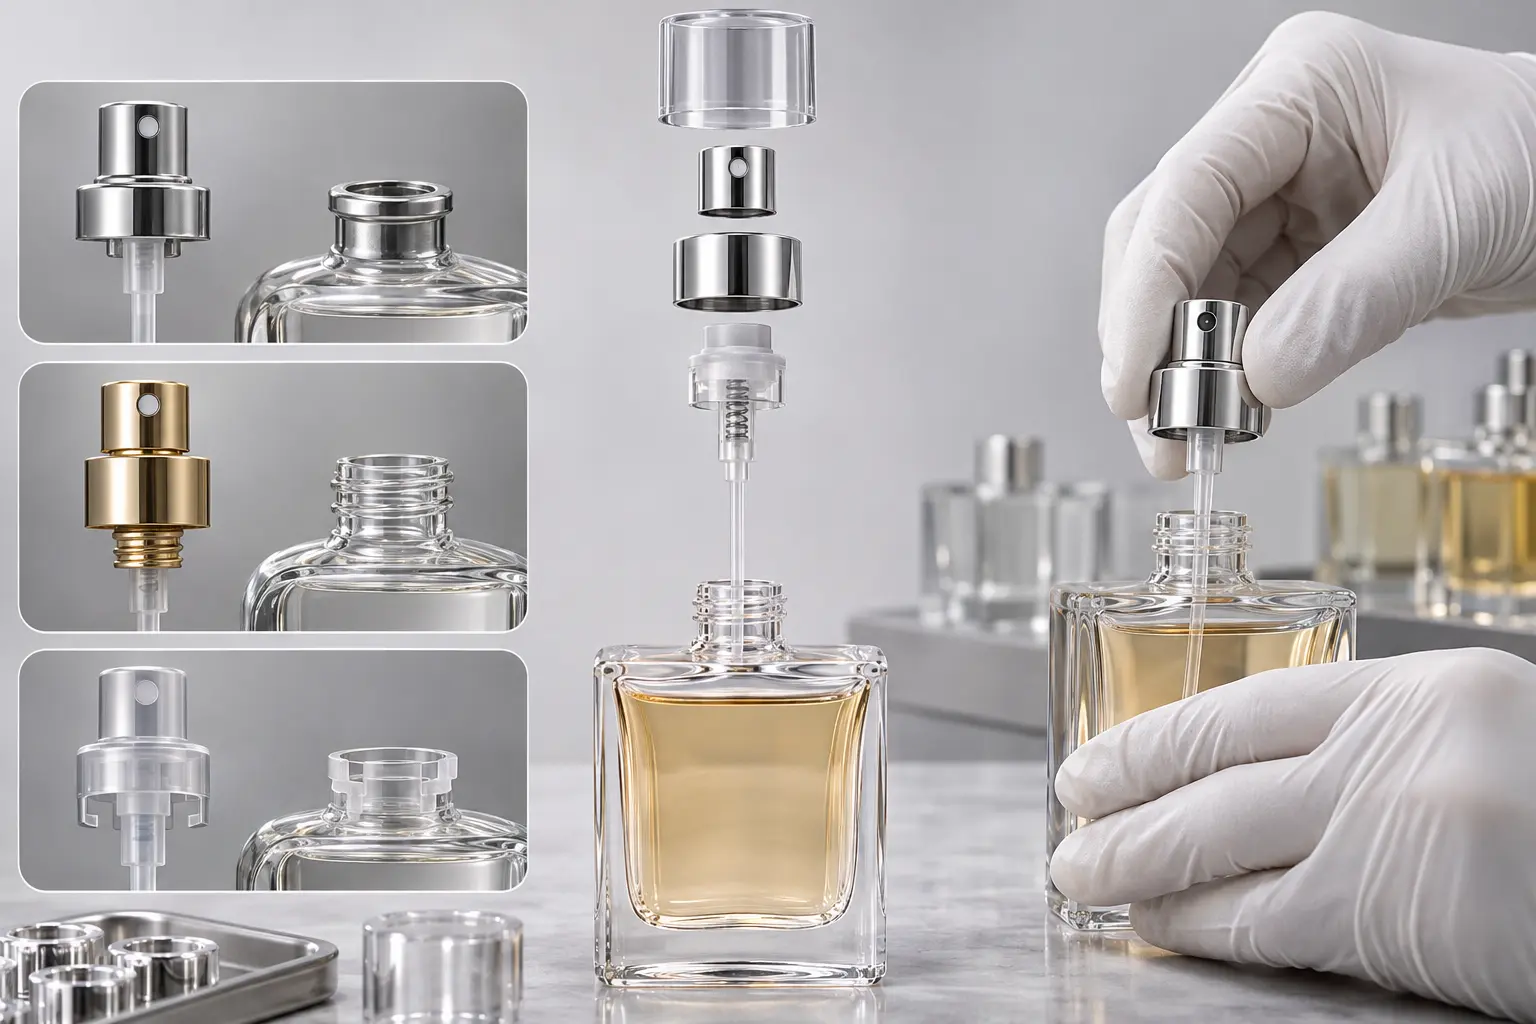
A perfume spray head should not be selected or installed by appearance alone. The bottle neck, pump attachment system, retaining components and dip tube must match. The correct installation method also depends on whether the package uses a crimp-on, screw-on, crimpless, snap-in or plug-type pump.
Before bulk production, the complete assembly should be checked for fit, retention, dispensing, leakage and cap alignment. A pump that can be attached to a bottle is not necessarily a pump that has been correctly installed.
This guide explains how to identify common perfume spray head attachment systems, prepare the components, assemble the pump and inspect the finished bottle. It also shows what perfume brands and packaging buyers should confirm with their suppliers before approving production.
1. Understanding How Perfume Spray Heads Attach to Glass Bottles
A perfume spray assembly connects several components to the glass bottle. The actuator is pressed by the user, while the pump mechanism moves fragrance through the dip tube and out through the spray nozzle. The bottle-neck interface and attachment components keep the assembly in position and provide the required sealing arrangement.
The exact construction varies by pump model. Two spray heads that look similar may use different retaining structures and require different bottle-neck specifications.
1.1 Main Components of a Perfume Spray Pump

Before installation, identify the parts included in the selected assembly:
- Actuator: The button pressed by the user to operate the pump.
- Spray nozzle: The outlet through which the fragrance is discharged.
- Stem: Connects the actuator to the pump mechanism.
- Pump body: Contains the internal dispensing mechanism.
- Piston and valve: Control the movement of liquid through the pump.
- Spring: Supports the return movement of the actuator, depending on the pump design.
- Dip tube: Carries fragrance from inside the bottle toward the pump.
- Ferrule or retaining component: Forms part of the pump attachment system, depending on the design.
- Collar: Covers or finishes the external neck area in designs that use a separate decorative component.
- Gasket or sealing component: Provides a sealing interface where required by the construction.
- Outer cap: Covers and protects the actuator.
Not every perfume sprayer uses exactly the same component arrangement. A ferrule and a decorative collar, for example, should not automatically be treated as the same component. Buyers should refer to the assembly drawing for the selected pump.
For a visual breakdown of the complete bottle structure, including the glass body, neck finish, atomizer, collar, cap and dip tube, see our guide to perfume bottle components and anatomy.
1.2 Pump Attachment and Liquid Dispensing Are Two Different Functions
Attaching a pump to a bottle and dispensing fragrance are related but separate requirements.
The attachment system determines how the pump connects to the glass neck. The dispensing mechanism determines how fragrance moves through the pump and exits the nozzle. A pump can appear correctly positioned while still having a dispensing or sealing problem.
Understanding the pump mechanism is useful, but it does not replace checking the physical connection between the pump and bottle.
1.3 Common Perfume Spray Head Attachment Systems
| Attachment system | Connection method | What must be matched |
|---|---|---|
| Crimp-on | Mechanical fastening with an aluminium ferrule | Crimp neck, ferrule and crimping equipment |
| Screw-on | Threaded connection | Thread dimensions, closure and sealing surfaces |
| Crimpless | External fixation without traditional crimping | Specified neck geometry and retaining components |
| Snap-in | Internal fixation using a snap-in structure | Matching internal neck geometry and pump design |
| Plug-type | Internal fixation using a plug structure | Matching bottle opening and plug dimensions |
These systems should not be treated as interchangeable. CETIE publishes separate technical references for plug pumps, snap-in pumps and crimpless pumps. Its glass packaging neck-finish specifications identify different geometries for these attachment systems.
For a side-by-side explanation of the two common bottle interfaces, see our guide to crimp vs screw perfume bottles.
In particular, CETIE GME40.04 describes external fixation without traditional crimping for specified pump references, including dedicated geometry for Silgan SP7 and SP8. Other crimpless pumps may follow the applicable EN 14854 neck-finish requirements. Buyers should check the actual pump reference rather than assume that all crimpless systems share one design.
The practical starting point is to identify the actual neck finish rather than assume that a pump will fit because its outside diameter looks similar.
2. What to Prepare Before Installing a Perfume Spray Head
Most assembly problems are easier to prevent before the pump reaches the bottle. Start by confirming the interface and all components rather than trying to correct a mismatch during installation.
2.1 Identify the Bottle Neck Finish
The neck finish determines which attachment system can be used. Check the bottle drawing or supplier specification for the actual neck structure and dimensions.
For crimp-on systems, confirm the specified crimp neck and ferrule combination. For screw-on systems, check the thread profile and dimensions. Crimpless, snap-in and plug-type pumps require their corresponding bottle-neck designs.
Do not select a pump simply because its nominal size appears similar to the bottle neck. A size designation alone does not establish compatibility.
2.2 Check the Complete Pump and Closure Set
Confirm the components supplied for the selected assembly:
- Pump model and attachment structure.
- Ferrule or retaining component, where applicable.
- Gasket or other sealing part.
- Collar and decorative sleeve, if included.
- Actuator and spray nozzle.
- Dip tube and its connection to the pump.
- Outer cap and its internal dimensions.
Pay particular attention to components that look similar but have different structures. A decorative collar should not automatically be treated as the part responsible for retaining or sealing the pump.
For a wider comparison of caps, pumps, droppers and dispensing components, refer to the Cosmetic Bottle Closures & Dispensing Guide.
2.3 Select the Correct Installation Equipment
The installation equipment depends on the pump attachment method.
- Crimp-on pumps: Require a crimping tool suitable for the specified ferrule and bottle-neck system.
- Screw-on pumps: Require the appropriate assembly method and controlled tightening according to the component supplier’s instructions.
- Crimpless pumps: May require a dedicated positioning or retaining tool, depending on the design.
- Snap-in and plug-type pumps: Must follow the insertion method and tooling requirements for the selected component.
Do not use one installation tool as a substitute for another merely because the pump heads have similar external dimensions.
2.4 Check the Dip Tube Length
The dip tube must reach into the bottle while remaining correctly connected to the pump. Its required length depends on the bottle’s internal height, base shape, pump construction and final assembly position.
A tube that is too short may leave more product below its pickup point. An excessively long tube may bend or press against the bottle base, depending on the internal geometry.
For this reason, dip tube length should be checked on the actual bottle and pump combination. Do not apply a fixed bottom clearance to every bottle shape.
3. How to Install Different Types of Perfume Spray Heads
There is no single installation sequence for every perfume spray pump. The following sections explain the main assembly requirements for each attachment system. The exact component order, tool setting and installation force must follow the technical instructions for the selected pump.
3.1 Installing a Crimp-on Perfume Spray Pump
A crimp-on pump is secured using a metal ferrule that is mechanically formed around the corresponding bottle-neck finish.
- Confirm the neck specification. Check that the glass bottle has the specified crimp neck for the selected pump and ferrule.
- Prepare the pump assembly. Check the pump, ferrule, gasket and dip tube for the correct model and configuration.
- Position the pump. Place the assembly in the intended position according to the component drawing.
- Align the crimping equipment. The tool must match the ferrule and bottle-neck design.
- Complete the crimping operation. Apply the specified process and equipment settings rather than using an assumed universal force or height.
- Inspect the finished connection. Check the ferrule profile, pump alignment, bottle neck and overall assembly.

Crimping quality depends on the relationship between the glass neck, ferrule and tooling. A connection that looks tight is not sufficient evidence of correct crimping.
CETIE’s crimping recommendations provide a technical reference for traditional aluminium-ferrule systems. These recommendations should not be applied to screw-on or crimpless systems.
FOLOVER Product Example: 10ml Cylindrical Glass Perfume Bottle with Crimp Spray
FOLOVER’s RPB-003-10 is a real product example of a crimp-neck perfume bottle configuration. Its published specification identifies a 10ml cylindrical glass bottle supplied with a crimp sprayer, inner plug and outer cap.
The component arrangement is important because the bottle, sprayer, inner plug and cap form one packaging set. Buyers should confirm the exact crimp-neck specification and selected pump before approving the assembly. The product page does not identify a confirmed FEA neck designation, so this should not be assumed from the product’s crimp-neck description.
See the FOLOVER 10ml cylindrical glass perfume bottle with crimp spray for the actual product configuration and available customization options.
3.2 Installing a Screw-on Perfume Spray Pump
A screw-on pump uses a threaded connection instead of a mechanically crimped ferrule.
- Confirm that the bottle thread matches the selected pump closure.
- Check the gasket and sealing surfaces for correct positioning and condition.
- Align the pump closure with the bottle thread before tightening.
- Engage the thread correctly without forcing the component.
- Tighten according to the supplier’s specified assembly requirements.
- Inspect the connection, pump alignment and cap fit.
Cross-threading or excessive tightening can affect the connection. The required tightening condition depends on the closure design and should be confirmed with the actual components.
3.3 Installing a Crimpless Perfume Spray Pump
A crimpless pump uses an external fixation system without the traditional aluminium ferrule crimping operation. However, this does not mean that any standard perfume bottle can accept a crimpless pump.
- Confirm the dedicated neck finish. Check the bottle drawing against the selected crimpless pump specification.
- Check the retaining components. Identify the parts responsible for external fixation and sealing.
- Position the pump. Align the assembly with the bottle opening and specified reference position.
- Install the retaining component. Follow the supplier’s specified assembly sequence.
- Use the designated equipment if required. Do not substitute an unapproved tool or apply an assumed installation force.
- Inspect the completed connection. Check the retaining position, alignment, fit and sealing condition.
CETIE GME40.04 is an important reference for this system, but its scope must be read carefully. It describes specific external-fixation neck geometry. Other crimpless pumps may follow different applicable neck-finish requirements.
To understand the internal pump structure and how the actuator, chamber, valves and dip tube work together, see our technical explanation of how perfume atomizers work.
3.4 Installing a Snap-in or Plug-type Perfume Pump
Snap-in and plug-type pumps use internal fixation structures. Both differ from an externally retained crimpless pump, and they also have separate neck-finish specifications.
For a snap-in system, the pump’s retaining features must correspond to the specified internal bottle-neck geometry. For a plug-type system, the plug and bottle opening must match the intended interference and sealing arrangement.
The general assembly review should cover:
- Confirm the correct pump reference and bottle-neck drawing.
- Inspect the internal bottle opening and pump retaining features.
- Check the gasket or sealing component where applicable.
- Position the pump in the correct orientation.
- Use the specified insertion procedure and equipment.
- Inspect the final seating position and retention.
CETIE publishes separate technical references for these interfaces: GME40.02 for plug pumps and GME40.03 for snap-in pumps. The actual pump manufacturer’s assembly instructions remain necessary for the installation procedure.
3.5 Fitting the Actuator, Collar and Outer Cap
After the main pump connection is complete, check the remaining external components.
- Confirm that the actuator is correctly positioned on the stem.
- Check that the spray outlet faces the intended direction.
- Position the collar or decorative sleeve according to the assembly design.
- Check the clearance between the actuator and outer cap.
- Confirm that the cap can be fitted and removed without unintentionally pressing the actuator.
For perfume packaging with a decorative metal collar or customized cap, the complete assembled appearance should be reviewed. A pump may fit the bottle technically but still create an unsuitable component height or visible gap when the outer parts are installed.
4. How to Check the Assembly After Installing the Spray Head
Installation is only one part of the approval process. The finished package must also perform as intended. A pump that is securely attached may still have a dispensing, sealing or component-clearance problem.

4.1 Check Pump Alignment and Retention
Inspect the assembled bottle from the side and top. Check whether the pump is visibly tilted, whether the retaining component is correctly seated and whether there are abnormal gaps around the neck.
For crimp-on assemblies, inspect the ferrule profile and crimp condition. For screw-on assemblies, check thread engagement. For crimpless, snap-in and plug-type assemblies, check the specified retaining position.
Any abnormal movement or visible damage should be investigated before the sample is approved.
4.2 Check Priming and Dispensing
A newly assembled pump may require initial actuations before fragrance reaches the nozzle. This is known as priming. The number of actuations depends on the selected pump and the test conditions.
ASTM D3890-18(2025), Standard Practice for Number of Strokes to Prime a Mechanical Pump Dispenser, describes a method for determining the number of actuations required to prime a mechanical pump dispenser. It can be used to compare priming characteristics of different pump dispensers and products, and to establish specifications for the pump and final package.
It is a measurement method, not a universal acceptance limit for every perfume sprayer.
During sample evaluation, record the initial priming behavior separately from the pump’s subsequent dispensing performance.
4.3 Check Spray Output and Pattern
Once the pump has been primed, assess its dispensing behavior using the selected fragrance or an agreed test liquid where appropriate.
| Inspection item | What to observe |
|---|---|
| Output per stroke | Whether the delivered amount matches the selected pump specification. |
| Spray pattern | Whether the spray distribution is consistent with the intended application. |
| Spray consistency | Whether repeated full actuations produce comparable results. |
| Actuator return | Whether the actuator returns after release. |
| Leakage | Whether liquid escapes from the nozzle, pump connection or bottle neck abnormally. |
Do not assume that a particular output per stroke is correct for every perfume pump. The selected pump’s documented output should be checked against the project requirement.
4.4 Check Sealing and Leakage
Leakage can occur at different points in a perfume package. The bottle-neck connection, internal pump seals and valve system have different functions.
Check the relevant areas separately:
- The connection between the pump and glass bottle.
- The gasket or sealing interface, where present.
- The pump mechanism and liquid pathway.
- The actuator and nozzle.
Depending on the project, evaluation may include visual inspection, controlled storage, orientation testing or an agreed leakage test. The test method, duration and acceptance criteria should be defined before testing.
A package should not be described as leak-proof under all conditions based only on a successful initial sample inspection.
4.5 Check the Dip Tube and Remaining Liquid
Observe whether the dip tube remains connected and correctly positioned inside the bottle. A tube that bends, becomes displaced or does not reach the intended pickup area can affect dispensing.
The bottle’s internal base shape also matters. A flat-bottom bottle and a bottle with a raised or sloped internal base may require different tube positioning. Confirm the result using the actual bottle and pump assembly rather than relying only on the external bottle height.
4.6 Check Cap Fit and Final Appearance
Fit the outer cap after the pump has been assembled. Check the overall height, collar alignment, visible gaps and actuator clearance.
If the package includes a coated, printed or metal-finished collar, review the actual finished components together. Decoration and component fit should be approved on the physical sample, not inferred from separate component photographs.
5. Common Problems During Perfume Spray Head Installation
When a spray head does not fit or function correctly after assembly, check the connection system before replacing the entire pump. The visible symptom does not always identify the failed component.
| Problem | Possible area to check | Recommended action |
|---|---|---|
| Spray head does not fit the bottle | Neck finish or pump reference | Compare the actual neck drawing and pump specification. |
| Pump sits at an angle | Positioning or assembly alignment | Inspect the connection and assembly sequence. |
| Pump feels loose | Retaining structure or thread engagement | Check the correct attachment method and seating position. |
| Liquid leaks around the neck | Gasket, sealing surface or connection | Inspect the sealing arrangement and assembled sample. |
| Actuator does not return | Actuator positioning or pump mechanism | Check for incorrect assembly or a pump-specific functional issue. |
| Spray is weak or irregular | Priming, dip tube, nozzle or pump mechanism | Check the dispensing system after confirming correct assembly. |
| Outer cap does not fit | Component height or internal cap dimensions | Review the complete component stack and cap clearance. |
For a deeper diagnosis of blocked nozzles, weak spray, pump failures and connection leaks, see our separate guide to common perfume sprayer problems and troubleshooting.
5.1 Can You Force a Spray Head That Does Not Fit?
No. Forcing a pump into an incompatible glass neck can damage the bottle opening or the pump components. Stop and verify the neck finish, pump reference and required installation method.
5.2 Can You Reinstall a Perfume Spray Pump?
Reinstallation depends on the attachment structure. A threaded component may be removable by design, while a crimped or retained assembly may not be intended for repeated removal. Crimpless, snap-in and plug systems also have product-specific removal requirements.
Do not assume that a pump can be removed and reused without affecting its retention or sealing performance. Confirm this with the component supplier before attempting disassembly.
6. What B2B Buyers Should Confirm Before Bulk Perfume Pump Assembly
For a commercial packaging project, the pump should be approved as part of the complete bottle assembly. Ordering the glass bottle, sprayer and cap separately without confirming their interfaces can create avoidable sampling and production problems.
6.1 Confirm the Complete Bottle and Pump Specification
Buyers comparing perfume glass bottles should confirm the neck finish and intended pump configuration before selecting the complete component set.
| Component | Information to confirm |
|---|---|
| Glass bottle | Capacity, dimensions, neck finish and drawing. |
| Spray pump | Model, attachment type and specified output. |
| Ferrule or retaining part | Structure, dimensions and material. |
| Gasket | Material, position and sealing design. |
| Dip tube | Material, length and connection to the pump. |
| Collar | Dimensions, height, finish and assembly position. |
| Actuator | Design, nozzle direction and movement. |
| Outer cap | Internal dimensions, clearance and retention. |
The supplier should identify the exact component references. A nominal neck size or bottle capacity is not enough to confirm the complete assembly.
6.2 Confirm the Installation Method and Filling-Line Requirements
Buyers should tell the supplier whether the package will be assembled manually or on a filling and assembly line. This affects the equipment and process information that must be confirmed.
For example, a crimp-on pump requires a suitable crimping operation, while a screw-on pump requires the appropriate threading and tightening process. Other retaining systems need their own assembly instructions.
For component sourcing, buyers can review FOLOVER’s pumps, sprayers and bottle accessories to compare available component options against the selected bottle.
Confirm the following before production:
- Whether the pump is supplied separately or pre-assembled.
- Whether the supplier provides the required installation tool or equipment specifications.
- The intended assembly sequence.
- How the assembled sample will be inspected.
- Whether the filling line can handle the selected bottle and closure combination.
6.3 What Should Be Included in Physical Sample Approval?
A sample should represent the intended production configuration. Approving the glass bottle and pump separately does not establish that the finished package will fit and function correctly.
Perfume Bottle and Spray Pump Sample Checklist
- Glass bottle and neck finish match the approved drawing.
- Correct pump model and attachment components are used.
- Ferrule, retaining part or threaded closure is correctly assembled.
- Dip tube is connected and positioned appropriately.
- Actuator operates and returns as expected.
- Spray output and pattern meet the agreed requirements.
- Sealing and leakage checks meet the project acceptance criteria.
- Collar and outer cap fit the complete assembly.
- Appearance and decoration are approved on the physical sample.
FOLOVER Project Example: Bottle and Closure Matching for Primage Gentle Massage Oil
FOLOVER’s Primage Gentle Massage Oil project in Korea provides a practical example of why a bottle and its closure should be evaluated together.
Primage had already selected its glass bottle, but the original closure system did not provide the required fit, sealing and assembly performance. The issue was not simply whether the closure could be placed on the bottle. The complete bottle-and-closure combination needed further review before bulk production.
The project development included:
- Neck specification check: Reviewing the selected bottle neck and its connection requirements.
- Closure selection: Identifying a more suitable closure configuration for the bottle.
- Assembly test: Checking how the selected components fitted together.
- Dip-tube adjustment: Reviewing the tube configuration against the bottle and dispensing requirements.
- Sealing and function tests: Evaluating the assembled package rather than approving the individual components separately.
- Sample approval: Confirming the bottle and closure combination before moving into bulk production.
The result was a stable bottle and closure combination confirmed before mass production, reducing the risk of leakage, poor fitting and functional problems during final assembly.
This was a massage oil packaging project, not a perfume atomizer installation project. Its relevance to perfume packaging is the component-matching approach: the bottle neck, closure, sealing interface and dip tube need to be considered as one assembled system. The specific pump and testing requirements still depend on the product and selected components.
See the FOLOVER Primage bottle and closure compatibility case study for the published project details.
6.4 What Should Suppliers Check During Mass Production?
Mass production requires the approved sample configuration to be translated into repeatable assembly and inspection requirements.
Depending on the agreed quality plan, checks may cover incoming component specifications, assembly position, crimp or thread condition, spray function, leakage, appearance and final packing. The inspection frequency and acceptance limits should be agreed for the specific project.
A successful sample does not, by itself, prove that every production unit will perform identically. Buyers should ask how the supplier controls component changes, assembly settings and inspection records for the selected pump model.
6.5 What Information Should Buyers Include in an RFQ?
Providing the following information helps the supplier review the bottle and pump combination more accurately:
Perfume Spray Pump RFQ Information
- Target bottle capacity and bottle drawing or reference sample.
- Neck finish specification, if available.
- Existing pump reference or spray-head photograph.
- Required attachment system: crimp, screw, crimpless, snap-in or plug type.
- Preferred actuator, collar and outer-cap design.
- Dip tube requirements, if already specified.
- Estimated order quantity.
- Whether components should be supplied separately or assembled.
- Filling, inspection and packing requirements.
- Destination market and any applicable documentation requirements.
If the neck specification is not available, send the bottle sample or clear photographs of the neck and existing pump. The supplier can then review what additional measurements or drawings are needed before recommending a component.
7. Frequently Asked Questions About Perfume Spray Head Installation
How do you attach a perfume spray head to a glass bottle?
First identify the bottle-neck finish and the pump attachment system. A crimp-on pump uses a ferrule and crimping equipment, a screw-on pump uses a matching threaded connection, and crimpless, snap-in and plug-type pumps require their corresponding retaining structures. Follow the component supplier’s assembly instructions and inspect the completed package.
What tools are needed to install a perfume spray pump?
The required equipment depends on the attachment system. Crimp-on pumps require compatible crimping equipment. Other systems may use a specified positioning, insertion or tightening method. Confirm the equipment with the pump supplier rather than assuming one tool works for every design.
Can you install a perfume spray head without a crimping machine?
Yes, if the selected bottle and pump use a screw-on, crimpless, snap-in or plug-type attachment system designed for that assembly method. A traditional crimp-on pump still requires the appropriate crimping process.
Are crimp-on and crimpless perfume pumps interchangeable?
No. They use different attachment structures and may require different bottle-neck geometries. A crimpless pump should only be used with a compatible neck finish and retaining system.
Why does a perfume pump feel loose after installation?
Possible causes include an incompatible bottle neck, an incorrect retaining component, incomplete seating or improper thread engagement. Check the actual component references and assembly instructions before attempting to tighten or reinstall the pump.
Why does a perfume bottle leak after fitting a new spray head?
The problem may involve the bottle-neck connection, gasket, sealing surface or internal pump components. Inspect the relevant sealing interfaces and evaluate the complete assembly using the agreed leakage test conditions.
How can you check whether a perfume spray pump is installed correctly?
Check the pump’s alignment and retention, inspect the bottle-neck connection, operate the actuator, assess spray output and pattern, check for leakage, and confirm that the collar and outer cap fit. The acceptance criteria should match the selected pump and packaging project.
8. Confirm the Complete Perfume Spray Assembly Before Production
A perfume spray head is not approved simply because it can be attached to a glass bottle. The bottle neck, pump attachment system, retaining components, dip tube, actuator and cap must work together in the intended package.
For buyers sourcing fine mist sprayers, the practical starting point is to confirm the bottle interface and pump reference, then evaluate the assembled sample before bulk production. Perfume-specific crimp pumps and other attachment systems should be checked against their own specifications rather than assumed compatible with general screw-neck sprayers.
FOLOVER Packaging Recommendation
For a new perfume packaging project, FOLOVER recommends reviewing the glass bottle, spray pump, collar and cap as one component set. If the bottle is already selected, provide its neck drawing or physical sample together with the existing spray-head reference.
Where the package also includes a specific fragrance formula, the contact materials, dispensing performance and sealing arrangement should be evaluated under the intended conditions. This gives buyers a more useful basis for sample approval than checking the appearance of each component separately.
Need Help Matching a Perfume Bottle with the Right Spray Pump?
Send FOLOVER your bottle drawing, neck-finish information, existing pump reference or packaging photographs. Include the required quantity and whether you need separate components or an assembled package. We can review the available information and discuss suitable component directions and sample requirements.